
ITAM App for Salesforce version 1.14 “Winter 2027 – Fast Onboarding” is available now on AppExchange. Version 1.13 gave new orgs a ready-made catalog of asset types. This release covers the rest of the first day: who can use the app, what to set up in which order, and how to get your people in as asset owners without typing them in one by one.
Ready to use the moment it’s installed
Until now, the first thing an admin had to do after installing ITAM App was find the Asset Admin permission set and assign it to themselves. In 1.14 the admin who installs the app gets Asset Admin automatically, so it opens with full access straight away. Upgrades leave your existing permission assignments exactly as they are.
A Getting started checklist
A new Getting started with ITAM App card sits at the top of the Home page. It walks you from installation to your first asset transfer in six steps:
- Assign permissions
- Maintain reference data, asset types and properties
- Create asset owners
- Add your assets
- Put ITAM Console first in the App Launcher (optional)
- Make your first asset transfer
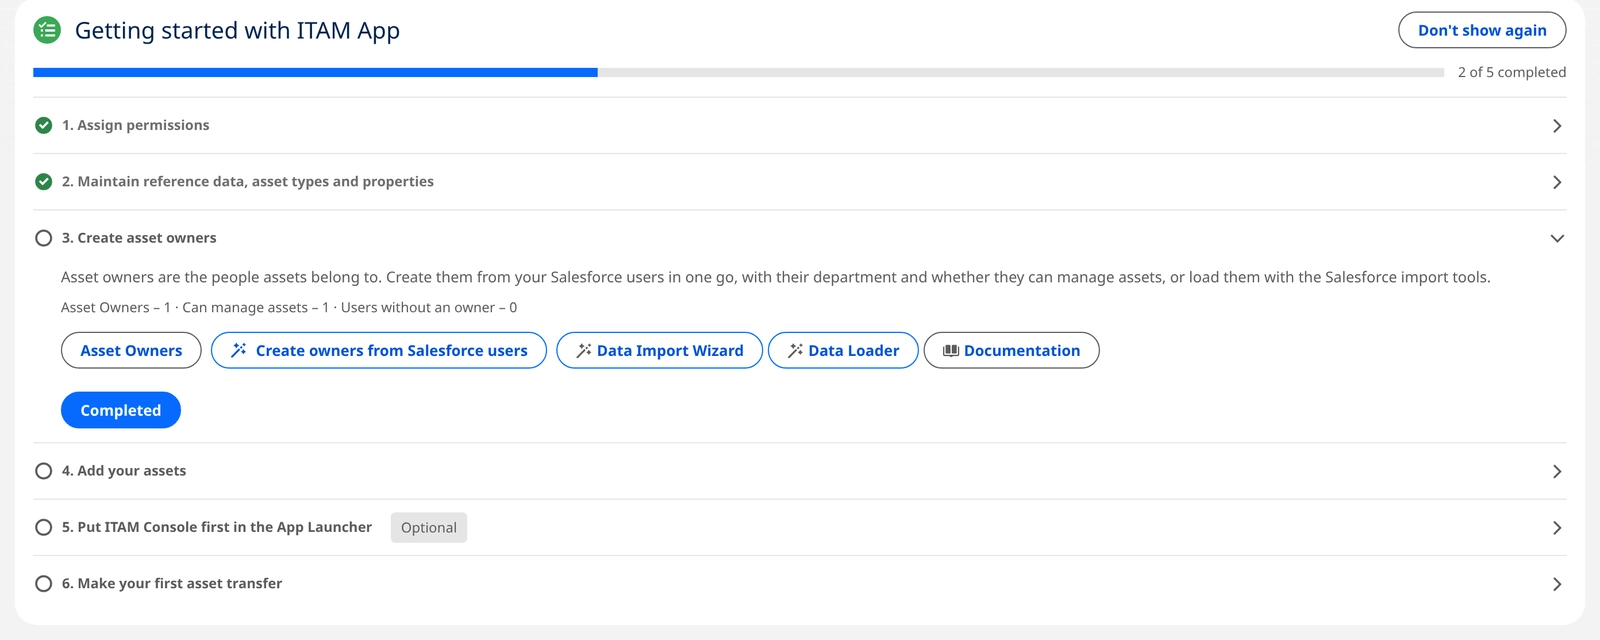
Each step explains what to do, links straight to the right tab or Setup page and to its documentation, and offers tools that speed it up, such as the Default Data catalog for asset types. Live counts show where you stand, for example Asset Admins – 1 · Asset Owners – 10. You decide when a step is done and tick it off yourself, and the checklist is shared, so every admin in the org sees the same progress. Once you’re set up, hide it from the Home page with Don’t show again. It stays on the Settings page.
Asset owners from your Salesforce users
Most of the people who hold assets already have a Salesforce user. The new Asset Owners from Salesforce Users tool lists your active users and lets you pick the ones you need, tick Can manage assets and choose a department for each, or for all of them at once, and create every owner in one click.
- No duplicates. Users who already are asset owners are left out, or marked as existing if you choose to show them.
- License-aware. The tool shows how many owner licenses remain and won’t let you select more.
- Clear results. If a user can’t become an owner, the others are still created and you see why that one failed.
Bringing in the assets you already have
Step 4 of the checklist points to the standard Salesforce import tools, Data Import Wizard and Data Loader. The documentation now spells out the order to load your existing assets and their property values in.
Upgrading
Install 1.14 over your current version and your data stays as it is. Nothing needs to be set up by hand. Your Asset Admins will see the Getting started checklist on the Home page; if your org is already up and running, press Don’t show again.
See the Getting started checklist and Create asset owners from Salesforce users in the documentation for the details.
New to ITAM App? Get it on AppExchange, or request a demo and we’ll take you from install to your first asset transfer in one session.